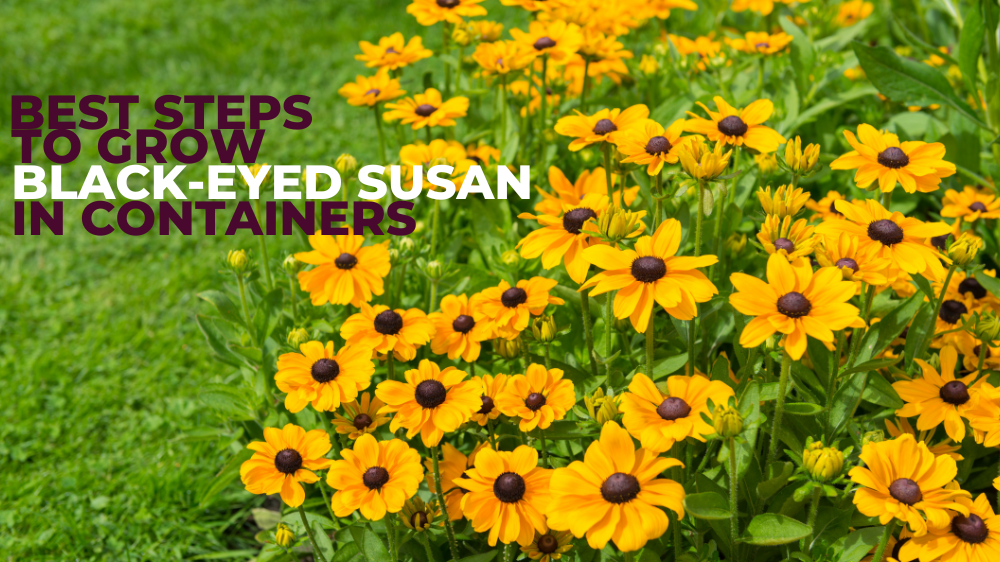
Best Steps To Grow Black-Eyed Susan In Containers
Best Steps To Grow Black-Eyed Susan In Containers
Are you looking for a stunning, nearly unbreakable plant? You want those. That's what Black-Eyed Susan are!
There's a reason why every perennial garden and landscape is dotted with these cheery yellow blooms. They are unsurpassable. A pollinator garden can benefit greatly from the addition of Black-Eyed Susan.
Birds, butterflies, and hummingbirds all eat the nectar and seeds of this plant. Follow my steps to grow Black-Eyed Susan in containers successfully.

History & Origin Of Black-Eyed Susan
Linnaeus named black-eyed susans during Columbus's visits in 1753. After his mentor Olaf Rudbeck and the Latin word hirta, which means rough or hairy, Linnaeus gave black-eyed Susan the name Rudbeckia Hirta.
Numerous Native American cultures were aware of and utilized the herb. The herb was used by the Native Americans to wash sores and swellings, as a poultice for snake bites, and to treat children's worms and colds.
The Black-Eyed Susan, Rudbeckia Hirta, was chosen as the state flower of Maryland in 1918. Every year, a massive drape fashioned from hundreds of Black-Eyed Susan is lifted onto the back of the horse that wins the Preakness, the second jewel in the triple crown of horse racing, giving this flower its moment of fame.
Annual Rudbeckia Hirta produces a lot of its seeds. It may grow in either full sun or light shade. It can withstand heat, drought, and soil.
Plant the seeds in the spring after the risk of frost has passed for the most outstanding results. Plant them at a maximum depth of ¼ inch.
Seed germination takes less than two weeks. Mature plants ought to be spaced at least 8 inches apart. By mid-summer, plants will start to produce blossoms and continue to do so until the first hard frost.
The history behind the flower's more well-known moniker, “Black-Eyed Susan,” is fascinating. Many people think that John Gay's poem from the 18th century is where the Black-Eyed Susan got its name.
The poem is about a woman looking for her boyfriend, William, while crying so hard that her eyes are black. Susan asks for William at his ship because he is a seaman.
The Black-Eyed Susan and Sweet William flowers flowing simultaneously during the poem's period symbolize the lovers' ultimate reunion.
Types Of Black-Eyed Susan
When you hear the term “Black-Eyed Susan,” you might picture a flower resembling a daisy with a black center and yellow rays.
Black-eyed Susans come in more than 40 different varieties. If you like the appearance of this flower, you might want to consider planting some of these.
Because this low-maintenance plant has so many options, choosing one could take longer than you anticipate. You should know the best varieties to grow Black-Eyed Susan in containers perfectly.
")
1. Indian Summer Black-Eyed Susan (Rudbeckia hirta ‘Indian Summer')
This summer bloomer can be grown in zones 3 through 7, producing enormous, daisy-like flower heads measuring nine inches. The rays are frequently bright yellow, but some of them could also be orange in colour.
The center disk of the Indian summer black-eyed Susan is domed and dark brown. This choice has hairy, lance-shaped leaves ranging from 3 to 7 inches.
")
2. Black-Eyed Susan ‘Moreno' (Rudbeckia hirta ‘Moreno')
In zones 3 to 8, the prairie sun black-eyed susan blooms from summer until frost. This plant produces flowerheads about 3 feet tall and about 5 inches in diameter, resembling common flowers.
The central disc of this black-eyed susan is green to yellow-green rather than the typical chocolate brown of other varieties. Prairie sun leaves are striking as they grow upright and are bright green.
")
3. Black Eyed Susan ‘Irish Eyes‘ (Rudbeckia hirta ‘Irish Eyes')
This flower, which may be produced in zones 5 through 9, has 14 to 20 rays that encircle a light-green disc with a maximum diameter of 5 inches.
Compared to typical black-eyed susan pants, the rays of this option are shaped more like a cup. They also get darker from the edge of the ray to its core. This plant will reach a height of about 24 inches.
")
4. Black Eyed Susan ‘Cherokee Sunset' (Rudbeckia hirta ‘Cherokee Sunset')
On this option, dark mahogany or a chocolate-brown disc that can reach a height of 36 inches is surrounded by yellow, orange, red, bronze, and mahogany rays that can be double or semi-double.
Around the middle are yellow hairs that resemble eyelashes. They frequently work well in fall gardens since they bloom for longer than certain Black-Eyed Susans with names that sound like they belong in the season. The first bloom should come around June.
")
5. Black Eyed Susan ‘Maya' (Rudbeckia hirta ‘Maya')
You'll be rewarded with beautiful yellow double flowers surrounding a green core that gets darker as the season progresses from this Black-Eyed Susan.
This choice has blooms that can grow up to 4.5 inches in diameter and thrive in zones 5 to 9. This option can reach a height of 24 inches and a width of 24 inches.
")
6. Black Eyed Susan ‘Cherry Brandy' (Rudbeckia hirta ‘Cherry Brandy')
You'll adore the chocolate brown center surrounded by crimson red rays with cherry red tips on this selection.
The golden filament of this plant shines out beautifully against the rest of it. From zones 4 to 7, the cherry brandy Black-Eyed Susan thrives. It will expand to a height and width of roughly 24 inches.
Grow Black-Eyed Susan In Containers
Many landscape designs should use the adaptable, heat- and drought-tolerant Black-Eyed Susan flower (Rudbeckia hirta).
Black-Eyed Susan bushes produce vibrant colours and velvety leaves all summer, requiring minimal gardener maintenance.

1. Choose The Right Container To Grow Black-Eyed Susan
They need to be cultivated in pots at least one gallon (4 L) in size and set in a spot that gets direct sunlight.
To grow your black-eyed susans, use a pot that is 1 gallon (4 L) or bigger. They will do better in a larger container.
They will blossom more and be bigger. Black-Eyed Susan should be spaced 18″ apart. Rudbeckia Seed Planting: About six weeks before the last day of frost, scatter the seeds on top of the standard seed starting mixture.
The seed should not be covered since it needs light to germinate. After any potential for frost has passed, transplant your seedlings outside.

2. Location To Grow Black-Eyed Susan In Containers
Full sun (at least 6 to 8 hours per day) is ideal for growing black-eyed susans. Although they can tolerate some shade, you might notice them extending and increasing in the direction of the light.
It's a good idea to plant Black-Eyed Susan where you won't mind seeing more of them because annual and perennial varieties are prolific re-seeders and are spread by underground stems.
Where flowers are placed in a garden bed, we should always consider the height they will eventually reach.
At various heights, Black-Eyed Susans reach their full maturity. Some can only grow as tall as 18 inches, while others can grow as tall as 4 or even 6 feet. To find out how tall yours are, look at the plant tag.
3. Soil To Grow Black-Eyed Susan In Containers
Plant in a sizable pot filled with porous, moist soil. Watch for signs of drying soil. These plants prefer full light, though they can still grow in partial shade.

4. How To Plant Black-Eyed Susan
Lightly cover the seed with soil. Sunlight is required for germination. To prevent the disease from spreading, plant seeds together to discourage it or space them apart to establish a barrier.
Even though they can endure challenging conditions, it's best if the soil is fertile (rather than poor).
- Black-eyed Susans typically reach between one and three feet, with a spread of 12 to 18 inches (but they can grow bigger). To prevent excessive spreading, plant seeds closely together; otherwise, space them widely apart to make a lovely border.
- Remove faded or dead flowers to prolong flowering. Seed heads and spent flowers can reduce self-sowing. Check your plants frequently to see if they require watering. Avoid letting them get too wet, as this could cause disease, and avoid letting them get too dry.
- Remove dead plant debris in the spring to reduce the risk of infection. Perennial forms should be divided every three to four years to maintain plant health and prevent overspreading.
- Black-Eyed Susan may produce a smaller bloom later if pruned after it blooms.
- Leave some dried seed heads on the plants in the fall to attract birds.
- Once the first season has passed, Black-Eyed Susans can self-seed.
- Rhizomes should be dug up carefully to ensure that every root is removed to prevent underground spread. Thanks to rhizomes, even the smallest fragments can grow into new plants.

5. Grow Black-Eyed Susan From Seed
Black-Eyed Susan can be started indoors from seed about six to eight weeks before the last anticipated frost to jumpstart the growing season. In trays or pots filled with a moistened seed starting mix, sow seeds ¼ inch deep.
After sowing, the seed tins for perennial types should be maintained in the fridge or another equally chilly environment for four weeks to ensure the best possible germination.
The seeded tray or pot should be placed on a heating mat or another warm surface, such as the top of the refrigerator or a table above a heat vent, because warm soil temperature is necessary for germination.
Seeds should begin to sprout within 7 to 21 days. Harden the seedlings off before transplanting them outside.
Once the daytime temperature is around 60 degrees, Black-Eyed Susans can be directly sown in the garden. If you don't want to start your seeds, you can buy transplanted seedlings and plants.

6. Watering Requirements To Grow Black-Eyed Susan
To establish the plants, keep them well-watered during their first season—an inch per week of rainfall or irrigation is adequate.
Once established, Black-Eyed Susan vines will be drought-resistant. Regular watering is necessary for them in containers; avoid overwatering.
Generally speaking, water container-grown Thunbergia when the soil feels just slightly dry on top. Remember that Black-Eyed Susan plants grown in pots tend to dry up more quickly than vines grown in the ground.
7. Temperature & Humidity To Grow Black-Eyed Susan
This plant thrives in warmer climates with summer temperatures of at least 60 degrees Fahrenheit. It manages humidity and drought well.

8. Propagating Black-Eyed Susan
A perennial with a brief lifespan, Rudbeckia hirta might not live long enough to grow into a sizable, thick cluster. If it does, however, it can be divided into progeny:
- With a shovel, pull the entire plant out of the ground. Utilizing pruners or a spade, divide it into two or more halves.
- When you observe new growth in a few weeks, replant each part in a different spot and maintain it well-watered.
- Black-Eyed Susan readily self-seeds so that you might have fresh plants in your flower gardens the following year.
9. Get Black-Eyed Susan To Bloom
Lack of sunlight might cause it to fail to bloom. To blossom, Black-Eyed Susans require full sunlight. Moving your plants to a new area where they would receive total sun exposure is one approach to fixing this.
Minor pruning may be enough to allow more light in if a tree or shrub is shading them. Too much nitrogen prevents Black-Eyed Susan from blooming, resulting in luxuriant foliage but no blooms.
If you must use a fertilizer, choose one high in bloom-promoting phosphorus (the plants frequently perform exceptionally well without fertilizing).
10. Deadhead And Prune Black-Eyed Susan
Black-Eyed Susan will bloom for a longer period of time if you deadhead them, which is the practice of removing spent, faded, or dried-up flowers after they have passed their prime.
Always trim the stem back to just beyond a leaf to prevent dead, dried-up stems from sticking out.
Keep some flowers as blooming slows down. They will produce seeds that the birds can eat and grow into new plants the following season.
To extend the blooming season of Black-Eyed Susans, cut back some of their stems by a third in the early summer.
Because the flowers you prune back will bloom later than the ones you leave alone, you can enjoy them for a longer period of time.
11. Pests & Diseases Of Black-Eyed Susan
The leaf spot fungus can affect Rudbeckia despite its high resistance to most pests and illnesses. Infected plants have small brown spots that enlarge on their leaves.
If the foliage is exhibiting symptoms of this illness, remove it. Most deer and rabbits will completely disregard the plant.
Still, when starving, they'll eat anything. Black-Eyed Susans can benefit from a few straightforward treatments for their minor ills.
Problematic insects can be deterred from consuming plants treated with neem oil. This ready-to-use spray from Safer Brand can help cure fungal issues that Rudbeckia may have. It can also be used for other plants.
12. Stake Black-Eyed Susan
Many Black-Eyed Susan varieties don't grow tall enough to need staking because they don't reach 2 feet.
However, if you're developing higher types, you might need to provide some assistance. Simply plow a stake through each plant's center, but not all the way through, and tie individual stems to the stake with twine.
The plant stems can also be wrapped in a thin lattice of two or three stakes, allowing them to bend gracefully at different angles.

13. Harvesting Black-Eyed Susan
A flower's seeds are ripe and ready to be collected three to four weeks after it has blossomed. Since Black-Eyed Susan blooms all during the growing season, you might be able to collect the seeds more than once through the summer and into the following fall.
The majority of flowers will typically be completed between mid-September and mid-October. However, double-verify because after you remove the seeds from the plant, they will not continue to grow.
The mature seeds have long, delicate veins that run their length and are charcoal gray to black. Cones must be completely dry.
Although these heads are resistant to breaking, wind, rain, and hungry birds can rapidly leave you with little to nothing to harvest, so be vigilant!
When the head is ripe, you can cut it off with some stem still attached, put it in a paper bag, and hang it upside-down to completely dry in a warm, dry environment using the stem.
Alternatively, to ensure that the heads thoroughly dry out, spread them out on newspaper or place them in a box in a warm, dry area. You're seeking a brittle, crispy cone. Once dried, the cones can be broken or shaken, or the seeds can be scraped away with your thumb.
You'll be left with a mixture of dark-coloured chaff and black seeds. The chaff consists of flowers and cone pieces that hold everything together.
There are many ways to eliminate the chaff, such as using a sieve or placing handfuls before a fan so the breeze would carry it away. Try several things and use what suits you the best.
Conclusion
Black-Eyed Susan is a lovely perennial flower but has strong therapeutic advantages. It shares many of the same medicinal qualities as echinacea and is closely related. So don’t miss adding the valuable plant to your small yard.
I trust you enjoyed this article on the Best Steps To Grow Black-Eyed Susan In Containers. Please stay tuned for more blog posts soon. Take care!
JeannetteZ
>>>Please click here to read my all-inclusive article about Container Gardening<<<
>>>Are you interested in homegrown herbs and medicine? Please click here to find out more about it!<<<

Your Opinion Is Important To Me
Do you have thoughts, ideas, or questions? I would love to hear from you. Please leave me your questions, experiences, and remarks about this article on the Best Steps To Grow Black-Eyed Susan In Containers in the comments section below. You can also reach me by email at Jeannette@Close-To-Nature.org.
Disclosure
This post may contain affiliate links. As an Amazon Associate and other affiliate programs, I earn from qualifying purchases at no extra cost to you. Read my full affiliate disclosure.
You might also enjoy these blog posts:
Best Steps To Grow Globe Amaranth In Containers
Best Steps To Grow Strawflowers In Containers
Best Steps To Grow Tansy In Containers
Best Steps To Grow Milkweed In Containers
Best Steps To Grow Bluebells In Containers